Linux Growing Pains Storage
Installing Ubuntu
Over the weekend I decided to move away from the VM and install Ubuntu 20.04 along side my current Windows 10 install. I use a 512GB SSD (Solid State Disk) for my Windows OS and I wanted to install Ubuntu on the same drive. I didn’t find a lot of documentation by Canonical on this process. I needed to shrink my current Windows partition and make a backup of my SSD before I proceeded. I used Macrium Reflect to accomplish these tasks as it is a software I am already versed in.
Macrium Reflect has a PE (Pre Environment) that can be built within the application. I created an image of my OS SSD and then wiped the drive. I then restored the image with the partitions resized to give Ubuntu ample space.
There may have been some issues with my EFI (Extensible Firmware Interface) or the Windows partition because Ubuntu did not detect the Windows installation. Running a CHKDSK (Windows Check Disk command-line) resolved this issue. /f stands for fix not force. The more you know.
chkdsk c: /f
After that, the Ubuntu installer was able to see my Windows installation. Truthfully, the first time I installed Ubuntu I didn’t see that option and just did partitioning manually, but GRUB didn’t get installed correctly. So, I deleted that install and used the built-in option to install alongside Windows. That seemed to have worked very well. The rest of the installation was quite easy. When booting my machine now, first GRUB is presented and then there is an option to continue to the Windows Boot Manager for a Windows OS boot.
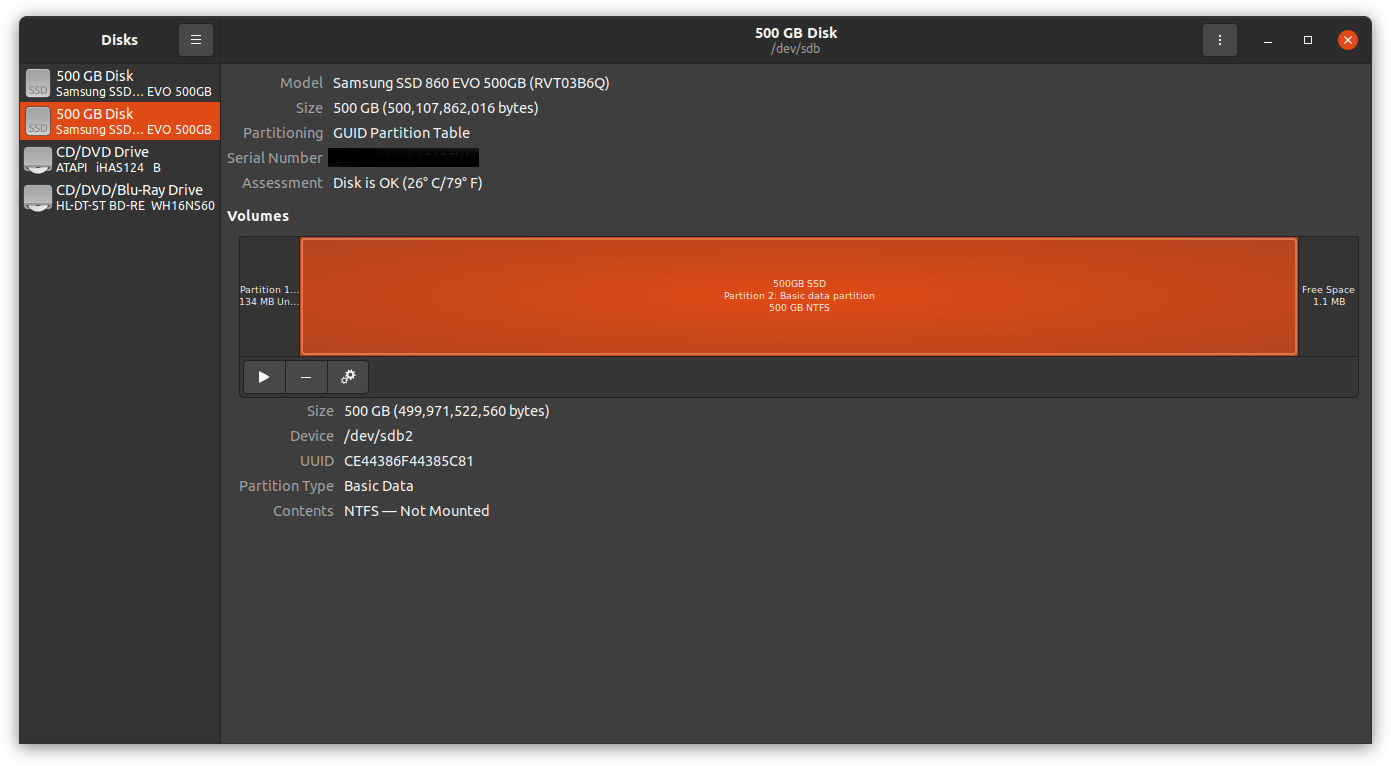
Additional Internal Storage
I have an additional SSD in my system. Two issues were apparent very quickly. My second SSD was not being recognized correctly and wasn’t automatically mounted. Coming from Windows, both these issues surprised me. All my user created partitions use GPT (GUID Partition Type) and NTFS (New Technology File System). This drive worked fine in a Windows environment. Ubuntu was seeing my second SSD’s partition as a VMFS (Virtual Machine File System). I didn’t really know what to make of this, and there were no obvious answers presented to me during my searching. Finally, I decided to wipe it with Diskpart (Windows disk utility command-line) and do a full format. I then copied all my data back with Robocopy (Microsoft Robust File Copy utility command-line). After this, it showed up normally as NTFS.
Note: These command-line utilities are very powerful and can have unintended consequences, please read Microsoft’s documentation before using them.
robocopy F:\ E:\ /DCOPY:DAT /COPY:DAT /MIR
To get it to mount automatically, I needed to use the Disks utility. First select the storage device in the left column, then select the partition you would like to have mounted automatically in the volumes area.
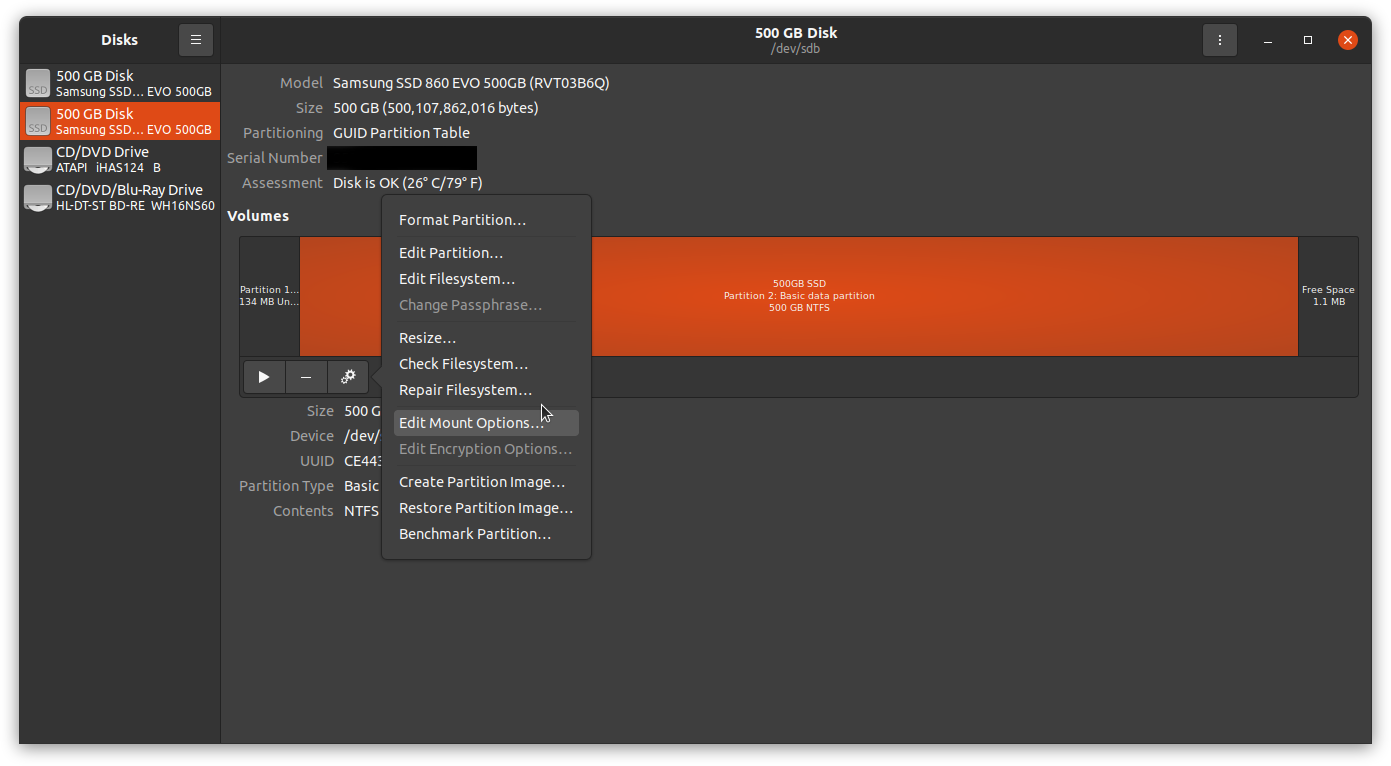
Once the desired partition is selected, click on the gear icon and select Edit Mount Options….
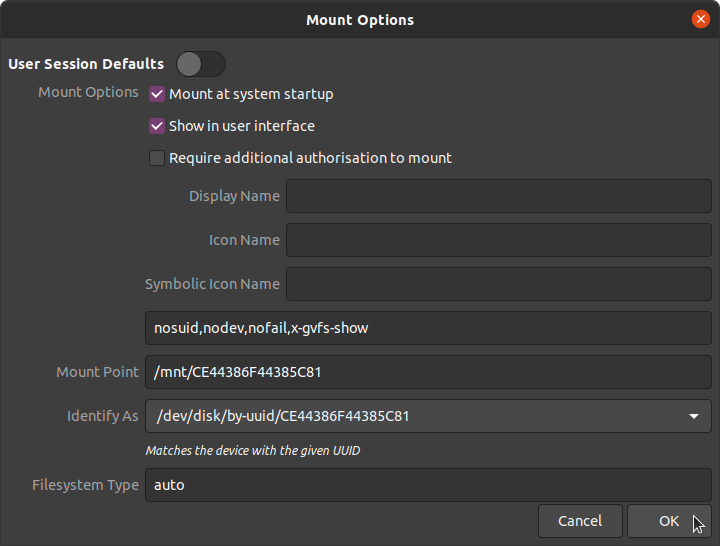
Slide User Session Defaults to off and check Mount at system startup. If you watch closely, you’ll see the noauto disappear when you check Mount at system startup. Applying these settings will add a line item to /etc/fstab for this device. fstab is the file systems table. It lists storage data sources.
As an example, here is my fstab below. The last line item was added when I set my second internal SSD to mount automatically.
# /etc/fstab: static file system information.
#
# Use 'blkid' to print the universally unique identifier for a
# device; this may be used with UUID= as a more robust way to name devices
# that works even if disks are added and removed. See fstab(5).
#
# <file system> <mount point> <type> <options> <dump> <pass>
# / was on /dev/sda5 during installation
UUID=f09bd060-2469-4cc9-a314-4066141efbb3 / ext4 errors=remount-ro 0 1
# /boot/efi was on /dev/sda2 during installation
UUID=9087-3902 /boot/efi vfat umask=0077 0 1
/swapfile none swap sw 0 0
/dev/disk/by-uuid/CE44386F44385C81 /mnt/CE44386F44385C81 auto nosuid,nodev,nofail,x-gvfs-show 0 0
Network Storage
I recently acquired a Synology DiskStation DS1621+. I wanted to add my network shares created on my NAS (Network Attached Storage). I was able to find this Ubuntu Wikiarticle that detailed the process. First, I needed to install cifs-utils. cifs-utils enables the usage of SMB/CIFS shares on Linux.
sudo apt-get install cifs-utils
spageet@spageet-desktop:~$ sudo apt-get install cifs-utils
Reading package lists... Done
Building dependency tree
Reading state information... Done
Suggested packages:
keyutils smbclient winbind
The following NEW packages will be installed
cifs-utils
0 to upgrade, 1 to newly install, 0 to remove and 42 not to upgrade.
Need to get 82.5 kB of archives.
After this operation, 306 kB of additional disk space will be used.
Get:1 http://us.archive.ubuntu.com/ubuntu focal-updates/main amd64 cifs-utils amd64 2:6.9-1ubuntu0.1 [82.5 kB]
Fetched 82.5 kB in 2s (45.7 kB/s)
Selecting previously unselected package cifs-utils.
(Reading database ... 192688 files and directories currently installed.)
Preparing to unpack .../cifs-utils_2%3a6.9-1ubuntu0.1_amd64.deb ...
Unpacking cifs-utils (2:6.9-1ubuntu0.1) ...
Setting up cifs-utils (2:6.9-1ubuntu0.1) ...
update-alternatives: using /usr/lib/x86_64-linux-gnu/cifs-utils/idmapwb.so to provide /etc/cifs-utils/idmap-plugin (idmap-plugin) in auto mode
Processing triggers for man-db (2.9.1-1) ...
My network shares are shared with SMB and require authentication. The wiki page described how to create a file with credentials so the password wasn’t stored in the fstab. I’ve called mine .synologycredentials. Leading with a period causes the file to be hidden. Hidden visually only, not in any type of security sense.
Note: Run the command below to open gedit with the file name you’d like to create. When you save, it will create the file.
I used the gedit Text Editor application to add the following two lines to .synologycredentials. These two lines will be used for authentication to your network storage. I had several shares with the same username and password so I was able to reference this same file multiple times. I assume if you had more credentials you’d need to create separate files in the same manner for each.
sudo gedit ~/.synologycredentials
username:spageet
password:SuperSecretPassword
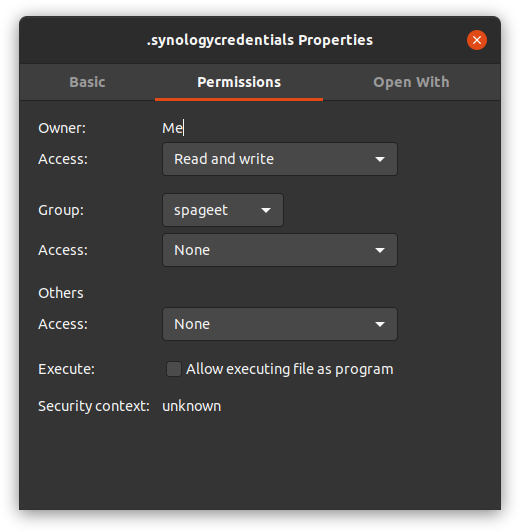
Then in terminal, adjusted the permissions of that file to 600.
chmod 600 .synologycredentials
Permissions displayed in the numeric format are defined as follows. The first digit of the three digit number is for “owner” permissions, the second for “group” permissions, andfinally the third is “other”. Each of these three digits can be one of the following numbers and their represented permission.
7 – Read, Write, Execute
6 – Read, Write
5 – Read, Execute
4 – Read
0 – No Permissions
So for the file I created for this task, I gave owner (myself), read and write permissions. Then both group and other got no permissions to that file at all.
Here are the permissions displayed in the Files application.
Once the file with our credentials is created, we need to add a line item to fstab for our network share. Once again using gedit to modify the file.
sudo gedit /etc/fstab
Here is the final line item configuration that worked for me.
//192.168.1.5/music /media/music cifs credentials=/home/spageet/.synologycredentials 0 0
When I went through this process I did run into a few things that were not mentioned in the wiki article. First, I needed to create the folder under /media before the shares would mount properly. For this example, I had to create a music folder under /media.
Then I was getting the following error.
sudo mount -a
mount error(22): Invalid argument
Refer to the mount.cifs(8) manual page (e.g. man mount.cifs) and kernel log messages (dmesg)
Looking at kern.log (Kernel Logging, includes dmesg output)…
tail -f /var/log/kern.log
Nov 18 21:11:49 spageet-desktop kernel: [ 1719.337207] CIFS: Attempting to mount \\192.168.1.5\music
Nov 18 21:11:49 spageet-desktop kernel: [ 1719.358002] CIFS: VFS: Unable to select appropriate authentication method!
Nov 18 21:11:49 spageet-desktop kernel: [ 1719.358009] CIFS: VFS: \\192.168.1.5 Send error in SessSetup = -22
Nov 18 21:11:49 spageet-desktop kernel: [ 1719.358025] CIFS: VFS: cifs_mount failed w/return code = -22
Ultimately, I ended up needing to remove sec=ntlm. We can look at the mount.cifs manual by running the man (manual) command as below. Looking at the documentation, ntlm is no longer the default authentication protocol. As of writing this, ntlmssp is the default. Your results will vary on this, because it is going to depend on the device you are connecting to. As noted by the error message, mount was unable to select the appropriate authentication method.
man mount.cifs
sec=arg
Security mode. Allowed values are:
• none - attempt to connection as a null user (no name)
• krb5 - Use Kerberos version 5 authentication
• krb5i - Use Kerberos authentication and forcibly enable packet signing
• ntlm - Use NTLM password hashing
• ntlmi - Use NTLM password hashing and force packet signing
• ntlmv2 - Use NTLMv2 password hashing
• ntlmv2i - Use NTLMv2 password hashing and force packet signing
• ntlmssp - Use NTLMv2 password hashing encapsulated in Raw NTLMSSP message
• ntlmsspi - Use NTLMv2 password hashing encapsulated in Raw NTLMSSP message, and force packet signing
The default in mainline kernel versions prior to v3.8 was sec=ntlm. In v3.8, the default was changed to sec=ntlmssp.
After you’ve added your new line to fstab and saved the changes, you can test your work using the mount command. The -a (all) switch will mount filesystems mentioned in fstab. As mentioned before, entries with noauto will not be mounted. This is when I was presented with my errors above, I was able to run this command each time and check the error logs for a solution.
sudo mount -a
Linux Storage Conclusions
It seems Ubuntu hasn’t made great strides in storage management since I used it all those years ago. Obviously, there are improvements, but I am still disappointed that something as simple as mounting storage can’t be included in GUI. For internal storage, if partitions are not going to be mounted by default, you should be prompted with this information on first startup, this would alert the user of the next steps.
In a Windows environment, it’s as easy as 123 with mapped drives. Windows handles all your network location passwords automatically in it’s Credential Manager. I’m aware Windows mapped drives are not without fault, and I’ve experienced those issues myself, but most of the time it takes less then a minute and it is easy to walk someone through the process. The process I described here is tedious and will frustrate many.
I’m trying to note all the things that I experience. I want to try to document this process as someone who isn’t comfortable with a Linux desktop environment. I’d love to see a maturing of some of these tools in the coming years.
I’m enjoying this learning process and I hope some of this could be useful to others.